Since Powerbuilder 10, Sybase introduced the web service feature.
According to Wikipedia,
A Web service is a method of communication between two electronic devices over the web. In other word, is a brigde technology for communicating 2 different devices over the web.
Simple explaination, imagine that you want to build a web project, and want to put status ticker to show the exchange rate from your bank. As long as your bank has a web service system to provide their customer to check the exchange rate, you can use it without making an own coding. You just need ask the bank for documentation how to use the exchange rate function.
In this article, I want to show you how to build web service within Powerbuilder and call it from Visual Studio in ASP.NET Visual basic language.
Global explaination is:
- Build 1 function in Powerbuilder as a web service to add 2 values or numbers and display the result.
- Put the web service in a server, let say the name is: abc.com
- Build 1 web project in Visual Studio, and put at xyz.com as a web server
- Call the function from abc.com from xyz.com
In this sample, I'm using Sybase Powerbuilder 12.5 Classic Evaluation version, and Microsoft Visual Studio 2008.
Chapter 1 - Building a web service in Powerbuilder
- Create a new Workspace and name it as you like (Pict 1)
- Create a new Target, choose .NET Web Service, and give a name as n_webservice (Pict 2a and 2b)
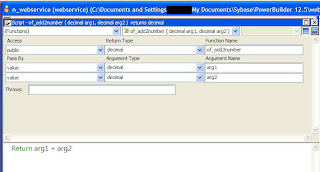
- Create a new FUNCTION in n_web service object, called of_add2number. Return type is Decimal. Add 2 value arguments in Decimal type, and named it as ARG1 and ARG2
- In a script canvas, type RETURN ARG1 + ARG2 (Pict 3)
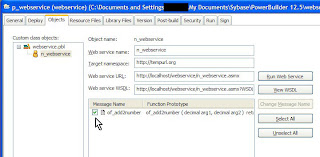
- Create a new new Project and give p_webservice as a name (Pict 4)
- In Object tab, make sure you check the of_add2number function in Message Name list. (Pict 5)
- Deploy the project, by clicking menu Run then Deploy web service
- Make sure that you didn't get an error when you deploy the web service
- Let say you uploading the web service into your web server at http://ww.abc.com/webservice directory
 |
| Pict 1 |
 |
| Pict 2a |
 |
| Pict 2b |
|
 |
| Pict 3 |
 |
| Pict 4 |
 |
| Pict 5 |
Chapter 2 - Calling the web service from Visual Studio
- Create a new web project and give WSPB as the name, IN OTHER COMPUTER / PC
- In Solution Explorer window, right click the WSPB project, and choose Add Web Service
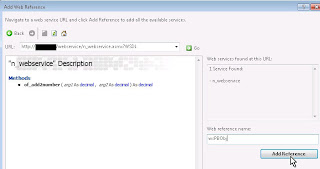
- In URL field, fill in with http://www.abc.com/webservice/n_webservice.asmx?WSDL then click Go
- It should be like an picture 10, rename the Web reference name as wsPBObj then click Add Reference button. Now we have a web service object with wsPBObj as a name. (Pict 6)
- In Default.aspx, add:
- 2 textboxes and named it as tbNum1 and tbNum2
- 1 label as lblResult
- 1 button.
6. In code behind at Button1 Click event, type the following code.
1:  Protected Sub Button1_Click(ByVal sender As Object, ByVal e As EventArgs) Handles Button1.Click
2:       Dim wsFromPB As New wsPBobj.n_webservice
3:
4:       Dim dResult As Decimal
5:       Dim dNum1 As Decimal
6:       Dim dNum2 As Decimal
7:
8:       dNum1 = System.Convert.ToDecimal(tbNum1.Text)
9:       dNum2 = System.Convert.ToDecimal(tbNum2.Text)
10:
11:       dResult = wsPBFromPB.of_add2number(dNum1, dNum2)
12:
13:       lblResult.Text = dResult.ToString
14:  End Sub
7. Click Ctrl + F5 to run the form and try to put 10 in Number #1 and 65 in Number #2, click EQUAL (Pict 7).
 |
| Pict 6 |
 |
| Pict 7 |


